10.25.2008

Bazaar Bizarre Neighbors

I had some great neighbors at the Bazaar Bizarre/Maker Faire. I think most of the $$$ I spent was at the booths around me because I only had intermittent help during the show. My dear, dear BF spent most of the time on his gas powered skateboard and gas powered bicycle. I think those toys were more popular than my jewelry when they were parked outside my tent :)

Anyway, I wanted to share some pictures of the crafters near my booth. They all had such wonderful work.


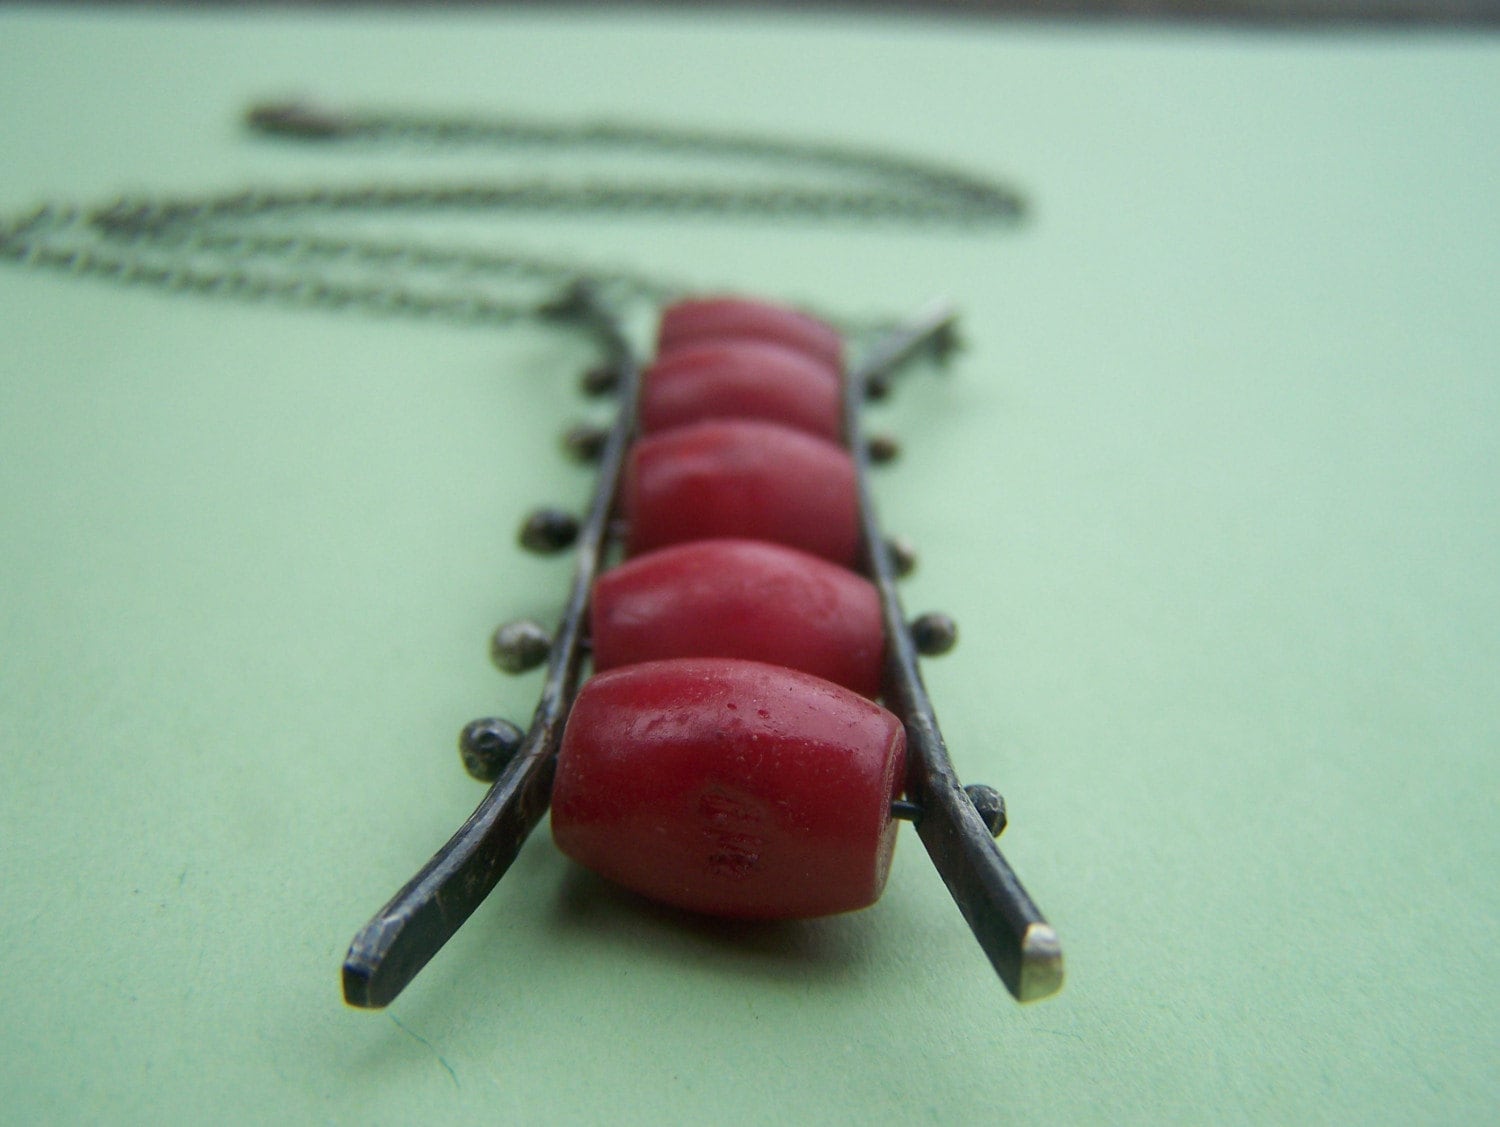
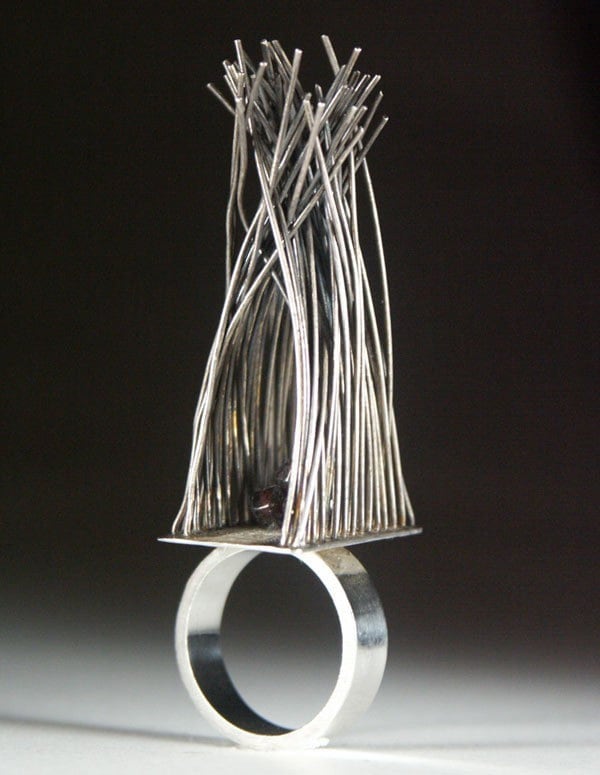
Xylocopa: They were right across from me. I think that is why I ended up with so many things from their booth :) I was staring at it for two days. I bought one of the awesome paper skulls (with a moustache!) and a couple of the blocks. All of her original illustrations are etched/cut with a laser. Amazing.

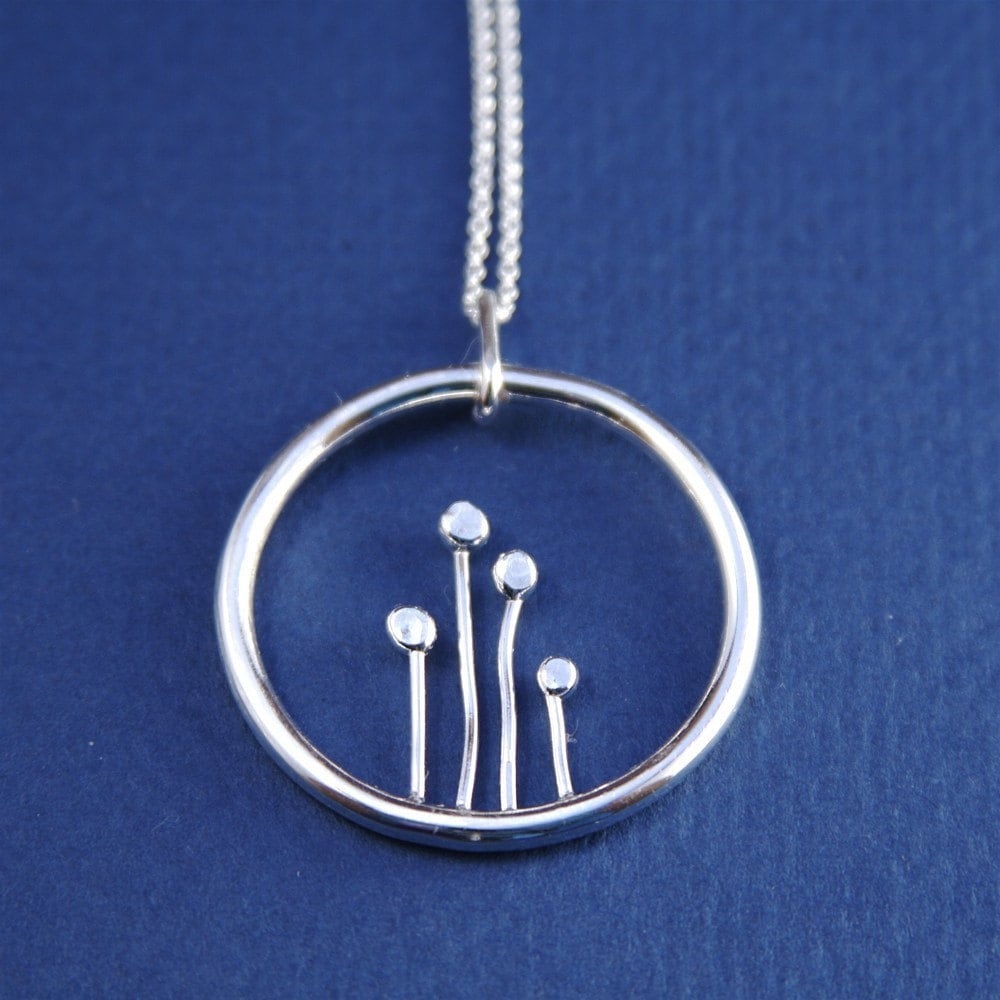
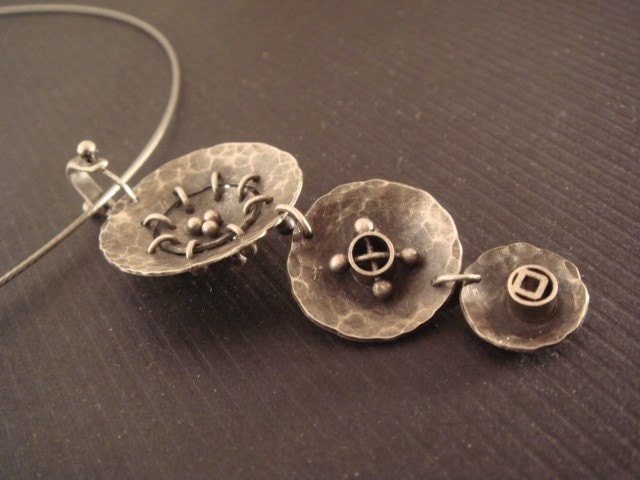
Some of the jewelry Michele of Xylocopa created.


Loop+Lil: I loved her sign. She had some very precious baby clothes, cute scarves and whimsical flower pins.


harrilu: I bought the black shirt in this picture. There isn't a picture of it but they also have this awesome Mexican wrestling mask shirt.


Designs by Lanese: These hand puppets are so soft and cute. And the Cupcakes for One were a great idea. She was behind me so I could hear the customers oohing and awwing over those :)

Belated Maker Faire Update

I intended to post some images of the freebie I was making for Maker Faire but ended up scrambling around doing all sorts of other last minute things right up to the morning I was setting up.

So here are some images of what I was doing:

I ended up using the rabbit image for the final product

My jig for cutting the bookmarks


I was using my Gocco and making bookmarks (that ended up being just postcards because of a bad initial paper choice). Don't use that awful Stardream paper with the Gocco. The ink just mushes around because it can't really adhere to the plasticy finish.

I made about 100 and they quickly disappeared. Think I might block off the Maker Faire part and make some thank you notes.

10.04.2008

And the Winner is...

... Robert. I also have a back-up winner in case Robert doesn't contact me by Monday.

Thanks everyone for participating. Hope to see everyone there! There are other contests going on and also many volunteer opportunities for the Maker Faire that will also result in tickets.

http://blog.craftzine.com/archive/2008/09/ways_to_win_maker_faire_austin.html

http://makerfaire.com/austin/2008/volunteer/

Robert, I need you to email me and also allow access to your profile so I can verify it is you because I have no email address for you.

9.29.2008

Maker Faire Ticket Giveaway


Guess what, folks! I'm hosting a Maker Faire ticket giveaway on my blog. You have until Friday at midnight (central time) to post a comment on my blog as to why you deserve these free tickets (kudos to creative responses). I have 2 adults and one youth ticket. I'm going to have a random drawing of all the participants and announce the winner on Saturday. Who ever wins will get all three tickets. Maker Faire makes a great family outing. This is for Austinites or those in the surrounding area (unless you know you'll be in the Austin area for the event). Please make sure you leave an email address so I can contact the winner about how they would prefer to receive the tickets.

And don't forget to come visit me at the Bazaar Bizarre going on in conjunction with Maker Faire!

Link to Craftzine's blog post.

Good Luck!

9.14.2008

Bazaar Bizarre Austin Oct 18-19, 2008

So, I was accepted into the Bazaar Bizarre craft fair. I'm so excited. I've been waiting for Austin to have one for a long time. It is happening in conjunction with Maker Faire October 18-19.

Funny part is, I have hardly anything to show so I've been constructing belt buckles and trying to make some new stuff. I've found it is easier to trudge through the familiar and let my mind wander while cutting out the gazillion images I use in everything. While I'm in a zone my mind comes up with all sorts of wonderful things to make after I'm done with my core inventory. Just hope I have time to get to it before the show :)

Hope anyone who can comes out to see the show. Last year, Maker Faire was incredible. It appealed to geeks and non geeks alike. All the fire and explosions help :)

P.S. Like my new belt buckle image?

7.26.2008

Some New Buckles

I enjoy getting custom requests. Makes it easier to get through creative blocks when someone says "Hey, do something with some organs or an octopus on it." I love my customers :)

Here are my latest two designs, enjoy!

Octopus Floating

Back Pain

Also, wish me luck. I applied to two shows last week, Bazaar Bizarre and Blue Genie. I finally got up the guts. I know my work is good enough to get in but I also know they are inundated with equally good work, so we'll see.

6.17.2008

Obama Belt Buckles


Obama Belt Buckle
Originally uploaded by lucyblueart
My newest belt buckles have been inspired by Obama. I couldn't help myself. I was so happy when he was finally confirmed as the Democratic nominee I sat down to make a buckle. When I was done I had 5 different designs, LOL! Go to my Etsy shop to see them all.

www.lucybluestudio.etsy.com

These particular buckles are $5 more than the rest because I am donating that to the Obama campaign. So tell everyone you know so they can help put him in office and show their support by wearing a Barack Obama Belt Buckle!

5.04.2008

Canvas Printing Update

I realized in my excitement I didn't really explain what I was doing or my equipment. Sorry about that. I spent so many days searching the internet for people using my specific printer with canvas so I would know it worked before I bought everything I needed but never really found the confirmation so here it is for other people in my shoes. I have an Epson R2400 and I use the roll feed. Some people cut the canvas and use the back feed (where you feed Velvet Fine Art Paper, but I don't see the point). You have to work the canvas a bit to make sure it is loaded properly but you'll know when it is because the printer will grab it. Epson has directions for loading roll paper and canvas on their website if you lost the instructions that came with your printer like I did. I chose to use The Epson PremierArt Water Resistant Canvas, mainly because of price and the fact I could get it in town for the same price as online.

As for color, it is pretty good if not quite as saturated as you see on screen or as what prints on photo paper. The print settings I used were obviously set to roll then Premium Presentation Paper Matte, the color controls were set to 1.8 gamma, epson vivid. I also made sure that borderless was checked and that high speed and edge smoothing were UNchecked. These settings seem to work for me but all printers and monitors are different so it helps if you already have an idea what your printer does and work with it from there.

I suggest having several prints ready to go and just let it print then trim them off. Be very careful not to touch the surface to be printed before or after printing on it. Let it dry at least 48 hours though I'd really suggest 5 days. Helps keep corner cracking to a minimum when you stretch it. After stretching, it will need a protective coat. I picked up a jug of PremierArt Eco Print Shield. Kind of pricey but it protects the image from dings and evil sunlight.

Also, realize the biggest prints you can get are going to be 11 inches wide if you are stretching the image (with the R2400 anyway. I have been looking at bigger printers since starting this). If you want a standard frame size then 11x14 but you could technically print 11 by the length of your roll if you wanted. Very nice for panoramic images. Of course it helps if there are stretcher bars the size of your image so plan ahead. I make sure my image is at least an inch larger on all sides so that I can do a gallery wrap of the image. I like it when the image continues over the side of the stretcher bars.

Hope this helps someone out there. This is the info I wanted to know before trying it but went ahead and jumped in anyway. Luckily things worked though I had one print that didn't feed properly and ended up with the image all squished together. Luckily, it was an image of a stand of trees and it ended up looking good despite what happened. Mistakes are pretty pricey but the results are worth it. It's funny what ends up looking really good on canvas. Not necessarily the same images that look good printed on photo paper.

4.17.2008

I Love Printing on Canvas!

I started printing on the canvas I bought and I am hooked. Weird. I've printed my own photos and wondered why I never experienced that "magic" I always heard about... you know, seeing your image first appear in the swirling chemicals. It was interesting the same way trying a new food is interesting but I wasn't compelled to live in the dark room to experience that little rush day after day. I've always loved working digitally but there is nothing very exciting about printing your own work that way either. The minutia of color management holds me captive until I figure out which way a particular media reacts to my printer then it is just a mechanical action. Heck, all I do at work is print all day long so doing it at home gets a bit redundant. Now, I do not have a very work efficient room. I realized that having my printer tucked behind my drafting table probably wasn't good planning but the room is so small I had no where else to put it.

So maybe it was the effort I had to go through to print on the canvas that made it so satisfying. I had to climb on top of the table and hover over the printer, balanced against the wall to attach the roll of canvas. I couldn't see behind the printer to feed the canvas without falling over so I had to feed
it by feel. It took awhile to figure out far to push the canvas into the slot so the printer would register it. Because of where the table and the printer butt up against each other I also had to keep my hands on the canvas as it came out of the printer so it wouldn't bunch up against the edge of the table. I didn't know what to expect when I got my first glance of the small sliver of color peeking out of the front of the printer. The relief and joy at seeing what I hoped to see was enough to cement my love for using canvas.

I've run through nearly the whole roll and realized I haven't even taken advantage of the texture and unique qualities. I was just so excited I printed my favorite images without much thought to how they would react to canvas. It changes the feel of any image, for better or worse and I'm sure some images just need to stay on paper. But I'm still learning and I'm sure my second roll will see much more adventurous experiments than this roll. Just had to share!

2.27.2008

Polymer Clay Musings

One of my favorite aspects of polymer clay is that it is so darn versatile. You can mimic almost any material, use it for molds, make jewelry, housewares, museum quality art pieces, create almost anything your imagination can dream up.

I'll admit, while I've mastered many techniques, there are a few that I haven't really gotten the hang of. One of those techniques is caning. Yes, I know, one of the most basic of the basics. I attempted it early on in my polymer clay adventures and didn't have much success. Part of it was I was too broke to commit the amounts of clay needed to cane properly. And I also lacked patience. I've tried it periodically through the years and each attempt has gotten better but it has never ignited my imagination enough to really work hard on it. I prefer sculpting and faux/antiquing techniques.

I'm sure y'all have seen plenty of my own work so here are two fellow Etsy artists demonstrating my two favorite methods....


antiquing
Dirty Love by huntersdesigns


and sculpting
Welsh Corgi by designsbyginnybaker

2.17.2008

Time for Another Etsy Fav's Round-up

This time I'm going to share my favorite silver pieces from Etsy. I finally got some silver stock to play with and have been looking at other work to see if I can figure it out what they did, as far as techniques go. I've never done traditional silver work and am pretty sure that my first few pieces will just be learning experiences since I don't have time for a class. I remember when I first started with PMC (precious metal clay). I used up about $75 worth of the stuff before I got the hang of it. I have some books and a few people I can call. So wish me luck.

2.13.2008

New Belt Buckles

I have finally started working on some new designs. I want to explore patterns and different ways to use them. I also found this great vintage children's book in Fredericksburg a couple weekends ago. They had shelves and shelves full of these tiny things. I bought the Buck Rogers one and might go back to get one of the Dick Traceys. Anyway, wanted to share my new designs. I haven't printed them yet so it'll be at least a week before I have them in my shop.

I am also attempting to find a good mold so I can turn some of my belt buckle images into pendants. I just love making these. They are the perfect little frames.

Enjoy!