
 This is such a cute idea. No idea where it came from but I like it...
10.22.2011


2.05.2010
Glazed Happiness (repost from The WonderCraft blog)
I'm not sure why it took me so long to fire my first batch of ceramic pieces. I've had my kiln for 2 years, fired PMC (Precious Metal Clay) in it and for my birthday last year, bought myself a block of clay. I stayed in my studio for days playing with the clay, re-familiarizing myself the texture and work time. I made some really cute stuff and rediscovered my love for basically playing in the mud.
And then all the work sat there. For almost a year.
As my dear friend, NJ would say, I had THE FEAR.
Not sure why I was afraid of running the kiln. I mean really? What was the worst that could happen? A few pieces explode? I've had that happen before, no big deal. So, I kept looking at the fragile greenware in my studio day after day. I moved them around, sanded down some edges, shuffled them from place to place when they were in the way, but never bothered to put them in the kiln. I used every excuse I could come up with... the garage was too messy so I can't get to the kiln, I should make other pieces just in case these break, I shouldn't be playing with these at all because I should focus on my resin pieces, maybe they aren't dry enough yet (because 8 months isn't enough time, LOL).
Well, 2 days ago, I got over it. I now have several bisque fired pieces with glaze drying on them, ready to be loaded back into the kiln for their final firing. Yes, I should have photos but it is the middle of the night. Give me a break. Taking almost a year to get this far has been work enough :) (UPDATE 02-04-10: added a pic at the bottom.)
Instead, here are some of my favorite ceramic inspirations. I'm looking at them with new eyes and a braver creative heart. We all get THE FEAR. Sometimes you just have to jump in and do. Stop thinking too much and do it.
And then all the work sat there. For almost a year.
As my dear friend, NJ would say, I had THE FEAR.
Not sure why I was afraid of running the kiln. I mean really? What was the worst that could happen? A few pieces explode? I've had that happen before, no big deal. So, I kept looking at the fragile greenware in my studio day after day. I moved them around, sanded down some edges, shuffled them from place to place when they were in the way, but never bothered to put them in the kiln. I used every excuse I could come up with... the garage was too messy so I can't get to the kiln, I should make other pieces just in case these break, I shouldn't be playing with these at all because I should focus on my resin pieces, maybe they aren't dry enough yet (because 8 months isn't enough time, LOL).
Well, 2 days ago, I got over it. I now have several bisque fired pieces with glaze drying on them, ready to be loaded back into the kiln for their final firing. Yes, I should have photos but it is the middle of the night. Give me a break. Taking almost a year to get this far has been work enough :) (UPDATE 02-04-10: added a pic at the bottom.)
Instead, here are some of my favorite ceramic inspirations. I'm looking at them with new eyes and a braver creative heart. We all get THE FEAR. Sometimes you just have to jump in and do. Stop thinking too much and do it.


Lyn Power
 Jill Taylor Clay & Magic
 Magnolia Pottery
************************************************************

Yes, not very refined pieces but apparently getting back into pottery is not like riding a bicycle. I need more practice. At least I have a good idea how the glazes react now. But I couldn't justify keeping the results to myself :) Along the top of the photo are some mini pots for my succulents, I also tried a little owl and mushroom sculptures to decorate some of my other potted plants and a few pendants. Enjoy!
Jill Taylor Clay & MagicMagnolia Pottery************************************************************

Yes, not very refined pieces but apparently getting back into pottery is not like riding a bicycle. I need more practice. At least I have a good idea how the glazes react now. But I couldn't justify keeping the results to myself :) Along the top of the photo are some mini pots for my succulents, I also tried a little owl and mushroom sculptures to decorate some of my other potted plants and a few pendants. Enjoy!
1.13.2010
Whew!
Wow, the holiday season was a busy time for all of us it seems. Running 2 crafty businesses with a full time job can takes it's toll but it was fun. I am all set to clean out my studio and get cracking on some new designs for Lucy Blue Studio.
Along with that, the girls and I have been working out the new hours for The WonderCraft's new boutique located behind the Art Pad at 4520 Burnet Rd. We debuted it in November to compliment our class and event offerings and are ready to really get it going. We are open from 12-6 on Saturday and Sunday. Of course, we also try to participate in crafty events around town so check our website to make sure we are there.

10.07.2009
Laptop Cozy
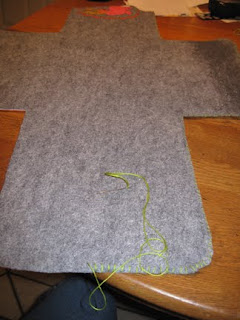
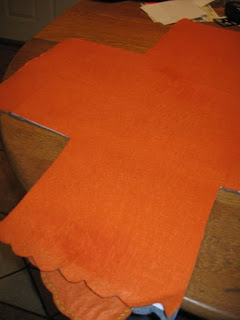
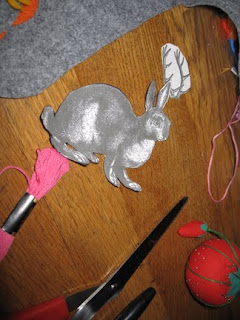
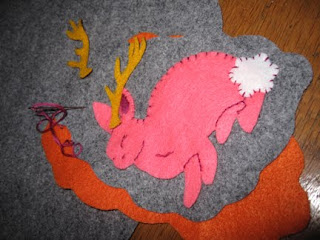
I found this project on Design*Sponge and decided to alter it a bit to suite my taste. I loved the colors they had picked out so I stuck with that. I have no sewing skills and don't really browse around in the sewing supplies either so I had no idea what sort of fuseable interfacing to use. I picked the wrong stuff. It was too thick and when I tried to iron it the only way I could get it hot enough to stick to the felt ended up melting the felt. So, I decided to hand stitch the entire thing together then embellish it with a hand embroidered, appliqued jackalope. The melty felt parts are on the inside and I think it is still super cute. Keeps my laptop from getting too scuffed when I'm carrying it around with me and every time I look at my new laptop case I get that satisfied "I made that!" feeling. I have a whole slew of new embroidery projects I want to try. I love working with the felt because of the color and the fact that I don't have to worry about any edges unraveling.



10.04.2009
Time to get Ready for Halloween!
So, I spent the weekend working on the fun stuff for my costume. My dad gave me this great blue hat that I spruced up with some feathers and a flower. I used the same feathers and flowers to embellish one of those mini hats that seem to be so popular on Etsy these days. Now I just have to decide which one to wear. They are both really cute.
I also made some jewelry that makes it look like my head and hands were stitched on to my body. I've seen a couple of people make these and they looked easy enough. I was right. I had a set whipped up in less than an hour. Of course, when I was trying them on to fit them I think I got super glue on my neck...
So tell me what you think. Weigh in on which hat you think I should wear.
 "Stitches"
 Mini Top Hat
 Full size, vintage hat
I also made some jewelry that makes it look like my head and hands were stitched on to my body. I've seen a couple of people make these and they looked easy enough. I was right. I had a set whipped up in less than an hour. Of course, when I was trying them on to fit them I think I got super glue on my neck...
So tell me what you think. Weigh in on which hat you think I should wear.
 "Stitches"
 Mini Top Hat
 Full size, vintage hat
9.09.2009
Craftiness is Genetic
When you ask crafters where they find inspiration you get the standard answers of nature, other crafters, family, etc, etc. Makes sense. We are products of our environment and what we surround ourselves with. Which is why I decided to focus on my grandmother as a source of inspiration this week. My grandmother just celebrated another birthday this past Sunday and I am continually amazed at how spry she is. Since I am trying to be a good grand-daughter, I won't mention her real age, but let's just say she was school age during the depression. I won't say which school *grin*.
 This is as messy as her work area gets.
Anyway, she is such an active person. Still heads up a local group for women trying to lose weight or keep it off (I'm convinced she joined because they get to put on little plays at the larger gatherings and she is in charge of the putting together the script and the costumes), works with the volunteer fire department and takes care of my grandfather, who is somewhere in the range of 10 years younger. Every Christmas she makes ornaments for the entire family and custom makes boxes for each of them. For holidays she has been known to make Santa or Easter Bunny place card holders for the dinner table and has sewn curtains to match the custom made sheets for the beds. Yes, she can make fitted sheets. My favorite is the ginormous Last Suppers she crochets during the winters for family member who are getting married. They are large enough to cover a good sized wall. She also keeps scissors all over the house. There is always a pair just a step away. She made holders for them all using those cheap pot holders you can get anywhere. She folded them into a cone, sewed them up and used the existing loop to hang them by.

To me, she is summed up by looking in her spice cabinet. She makes labels for all the jar lids, has them on a tiered shelf and each row is alphabetized. This is my grandmother. Organized, neat, precise and just a little spicy.

8.31.2009
Mold Making is Easy and Fun!
Mold making is fun and easy. It also helps open up new possibilities in so many crafty areas. Love your vintage button collection but don't want to use it up? Have a necklace design in mind but can't find enough beads to complete it? Love sculpting figures but can't seem to reproduce your favorite creations? Well, there are several simple mold making techniques you can try to help solve those issues.
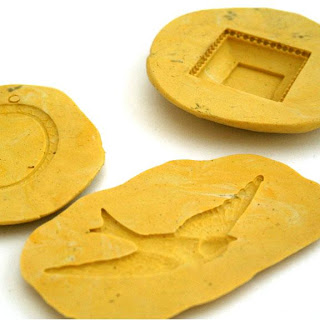
Simple one part molds can be used to capture textures or patterns with ease. Making buttons or cabochons is simple when you use a 2 part silicone mold making material. No need to worry with complex, multi-part molds and you can get to producing multiple parts in no time. This works great with clay or casting resin.
Liquid latex can be used to make slightly more sophisticated molds of 3d objects as well and objects that require the ability to capture more detail than the 2 part silicone molds can provide. This can either be brushed on or poured, depending on the product.
2 part molds can be used to make molds of more complex figures or 3 dimensional objects that may need more support than the liquid latex can provide. These can be made out of plaster or silicone rubber and are great for casting objects out of resin or for use with clay.
If you are interesting in learning any of these techniques there are several classes available! Check them out!

Simple one part molds can be used to capture textures or patterns with ease. Making buttons or cabochons is simple when you use a 2 part silicone mold making material. No need to worry with complex, multi-part molds and you can get to producing multiple parts in no time. This works great with clay or casting resin.
Liquid latex can be used to make slightly more sophisticated molds of 3d objects as well and objects that require the ability to capture more detail than the 2 part silicone molds can provide. This can either be brushed on or poured, depending on the product.
2 part molds can be used to make molds of more complex figures or 3 dimensional objects that may need more support than the liquid latex can provide. These can be made out of plaster or silicone rubber and are great for casting objects out of resin or for use with clay.
If you are interesting in learning any of these techniques there are several classes available! Check them out!
8.20.2009
Rubber Stamp Carving via The WonderCraft
There is still room in my class next Wednesday evening. Such a flexible skill to learn.
I made all these stamps to work on a book making project. I used black ink and stamped them on white paper. Then, after the ink was dry, the images were scanned so they could be used on my digital projects but still maintain a hand made feel.

Rubber Stamp Carving - Adults - 8/26/09
I made all these stamps to work on a book making project. I used black ink and stamped them on white paper. Then, after the ink was dry, the images were scanned so they could be used on my digital projects but still maintain a hand made feel.

Rubber Stamp Carving - Adults - 8/26/09
Carving your own unique rubber stamps allows you to add a personalized touch to your paper creations. In this class you'll design and carve 2-3 small rubber stamps and create a set of note cards with them. Once you learn the technique, you'll be able to turn any of your artwork into a rubber stamp for use on stationery, gift wrap, your own business cards and more!
Here is a picture of the one tool you'll need to buy. I know I like to see what the tools look like before I shop for them. Makes it easier to know what you need :)

7.02.2009
Geeky Inspiration
I've been getting a kick out of Neill Cameron's blog for the past few weeks. He has been doing an A-Z of Awesomeness (or going through the alphabet letter by letter and doing a really great comic-inspired illustrations). Here is a link to his explanation. My favorites so far have been the D and the J. Lately, I have been reveling in my geeky predisposition. I don't even mind that I have become a cliche. So enjoy what has been tickling my fancy lately and expect some more geeky designs to come your way!


6.18.2009
Roller Derby & Crafty Goodness
Come out and join me and 2 other talented EtsyAustin members, Kim of Devil Girl Design and Camille of Diamonds and Guns at the Roller Derby this weekend. Click the picture to go to the official website for all the pertinent information! It is guaranteed to be a good time.

See you on the track!
5.08.2009
I Like Robots
 Figured I'd continue with the cartoon images I've been coming up with and retool my robots. You can't have enough geeky designs as far as I'm concerned. And now that I received my cufflink blanks (finally! Yeah!) I needed new designs to work with. The circuit board pictures just begged for an illustrated robot to accompany them. He's almost smiling! He's trying his best. Look for them in my Etsy shop soon.

4.22.2009
Etsy Earth Day
It is such a beautiful day in Austin to be celebrating Earth Day. Here are some of my favorite recycled/upcycled, Earth Day themed items from the Etsy Austin Street Team. For more Etsy Austin goodness, type in teametsyaustin in the Etsy search bar.


4.21.2009
I've Been Blogged!
http://craftymishmash.blogspot.com/
Beth from Crafty Mishmash and The Snuggle Herd posted an interview with me on her blog. Check it out!

Beth from Crafty Mishmash and The Snuggle Herd posted an interview with me on her blog. Check it out!

4.14.2009
Easter Weekend Recap
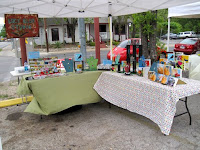
I just want to say that Austin Handmade is doing a wonderful job with their market. Even with the sketchy weather we had plenty of foot traffic. I'm sure we would have had even more if the sun had decided to make an appearance. Here are a few shots of my booth.
 Lug standing guard under the table where it is safe
 I also spent the weekend with some of my new plants. I'm going to try my hand at a small vegetable garden. We'll see how that goes since I can still only plant in pots and planters because the backyard is still in a state of limbo.
 I have several tomato plants, some different varieties of peppers, some herbs and squash. I wanted watermelon but there is no way I can grow that with the eminent digging up of the backyard. We live on a hill with the house midway down so when it rains all the dirt runs down toward the house and makes it hard to grow anything in the backyard. We are going to add terraces and put the dirt near the house back at the top of the hill with plenty of drainage and retaining walls. Still trying to figure out how to do this and still leave Penelope plenty of room and a path for playing frisbee. I'm already designing the layout of my planter boxes and where I want the hammock.
 Lug standing guard under the table where it is safe
 I also spent the weekend with some of my new plants. I'm going to try my hand at a small vegetable garden. We'll see how that goes since I can still only plant in pots and planters because the backyard is still in a state of limbo.
 I have several tomato plants, some different varieties of peppers, some herbs and squash. I wanted watermelon but there is no way I can grow that with the eminent digging up of the backyard. We live on a hill with the house midway down so when it rains all the dirt runs down toward the house and makes it hard to grow anything in the backyard. We are going to add terraces and put the dirt near the house back at the top of the hill with plenty of drainage and retaining walls. Still trying to figure out how to do this and still leave Penelope plenty of room and a path for playing frisbee. I'm already designing the layout of my planter boxes and where I want the hammock.
4.10.2009
Austin Handmade Market
 The market is going on this Saturday, April 11th from 12 pm-6 pm at 507 West Mary Street (next to the Soup Peddler.) The weather should hold during the day and give everyone a great head start on shopping for Mother's Day and Father's Day. I didn't attend the last one but I heard it was a great event and everyone had lots of fun. Come out and see my new designs!
Some Fun Easter Facts & Family Tradition
 I figured I'd celebrate Good Friday and the upcoming Easter Sunday with a few fun facts I've collected along with a little peek into my own family traditions.
 A Pysanka is a Ukrainian Easter egg, decorated using a wax-resist (batik) method. The word comes from the verb pysaty, "to write", as the designs are not painted on, but written with beeswax. (from wikipedia). This image is of the world's largest pysanka. It was erected in Vegreville, Alberta in 1974, commemorating the 100th anniversary of the Royal Canadian Mounted Police.
 Norway has to have my favorite Easter tradition. In Norway, in addition to staying in mountain cabins, cross-country skiing, and painting eggs, a contemporary tradition is to read or watch murder mysteries at Easter. All the major television channels run crime and detective stories, magazine stories where the readers can try to figure out "whodunnit", and new detective novels are scheduled for publishing before Easter. Even the milk cartons are altered for a couple of weeks. Each Easter a new short mystery story is printed on their sides. I couldn't find the origin on this tradition. One can only speculate.
Easter candy facts:
- Easter is the second top-selling confectionery holiday behind only Halloween.
- 88 percent of adults carry on the Easter tradition of creating Easter baskets for their kids.
- 76 percent of people eat the ears on chocolate bunnies first.
- Red jelly beans are kids’ favorite.
- According to the Guinness Book of World Records the largest Easter chocolate egg ever made was just over 25 feet high and made of chocolate and marshmallow. The egg weighed 8,968 lbs. and was supported by an internal steel frame.
Anyway, the aunts would head to the kitchen and finish up the Easter meal. Sometimes we barbecued, sometimes we had a ham. We always had "sweet rice" and my grandfather's green beans. Everyone would go outside for the egg hunt and the kids would finally get to look in our nests. It was always filled with lots of candy, at least one giant chocolate bunny and all the rest of the Easter prerequisites. The eggs we hunted were always the real thing—hard boiled and decorated with dyes. We were so excited to go look for them, though none of us ate hard boiled eggs. After we compared baskets and figured out who found the most we turned the eggs over to our mothers so they could work their magic on them. We might not eat plain hard boiled eggs but we all stuffed ourselves on the deviled eggs. I loved it when the dye worked it's way through the shell and died the egg itself.
My aunts would always go through all the eggs before peeling them and select the two prettiest eggs to take to my grandmother's aunt later that day. She was elderly and rarely left her house at that point so after the meal, we would pack up some leftovers and the winning eggs and go visit. Aunt Babe had a knick knack shelf in her dining area where she kept all the eggs we brought over the years. Some were old enough you could shake them and hear the powdered residue of it's contents still inside. Luckily, I don't think any were ever accidentally broken. The smell would have been much worse in her small house than it was out at the farm when we would finally come across those few eggs that had been forgotten outside in the hot Texas spring weather.
 I always wished that the youngest of our cousins had been able to experience that time in our family history. After our grandfather passed away so many of our traditions died out and the younger ones were too small to remember any of them. We all celebrate separately now, with a watered down version of how it used to be. It is bittersweet. I am thankful every year when I am reminded of my childhood and a little sad that those days are gone.
4.09.2009
Shop Austin


3.31.2009
Doctor Who Redeux
 Last week I posted about some of my favorite Doctor Who Etsy finds and said I would be working on my own designs for my belt buckles. Well, I did a set of three. The buckles aren't ready yet but I figured I'd post a sneak peek of the designs. A girl has to do something while waiting for new episodes.
 I was determined that the Dalek design wouldn't be my favorite because everyone loves them, but it couldn't be helped. It's my favorite. I can't decide which Doctor is best so I just went with the TARDIS. Hope everyone enjoys the designs. Keep checking my Etsy site for the buckles. Should be soon.
***4-10-09: All the Doctor Who themed belt buckles are now in my Etsy shop!
3.27.2009
HaHa
 I wasn't going to blog today until I found this. So I'll make it short and sweet. This is for all of the design and typography nerds out there. It isn't the first clever kern accessory but I like it. It made me smile. You can find it at plastique's etsy shop.
3.26.2009
More Flowers with TtV
 I recently built another contraption with a new twin lens reflex camera in order to do TtV photography. My first attempt was with a Kodak Duaflex II camera but I went back to ebay to find a plain old Duaflex. It seems to work better. I also attached a lens hood to the front of the contraption to help with the lens flare problem. I'm still getting a small blue vignette on the right side of the image but I think I will be able to adjust the new contraption to solve that. It is interesting sometimes but I'd rather add that later in Photoshop if I want it rather than be a slave to it.
The flowers were all recently aquired during my gardening bug. I have been barrerd from going to any more gardeing stores until after we rebuild the fence in our backyard. I had been using redoing the backyard as an excuse to buy more plants... to have them ready to go when we can finally plant things back there. For now, my front porch is colorful.


Subscribe to:
Posts (Atom)


 Posts
Posts

